Training
Mastering Road Manager
Training Videos
Explore our comprehensive Traffic Control Planning Training Videos, designed to equip you with essential knowledge and skills for efficient and safe traffic management. Learn the fundamentals, best practices, and strategies to ensure smooth-flowing roadways and enhance traffic control expertise.
Road Manager Powered by Google Maps
Road Manager Navigation Basics
Road Manager Share with Link
Road Manager Snap to Road
Keyboard Shortcuts
Road Manager Training Video 2021
Custom Task Box
Road Manager – The Background to Development
Training Images
Explore our comprehensive Traffic Control Planning Training Videos, designed to equip you with essential knowledge and skills for efficient and safe traffic management. Learn the fundamentals, best practices, and strategies to ensure smooth-flowing roadways and enhance traffic control expertise.
Drawing Screen
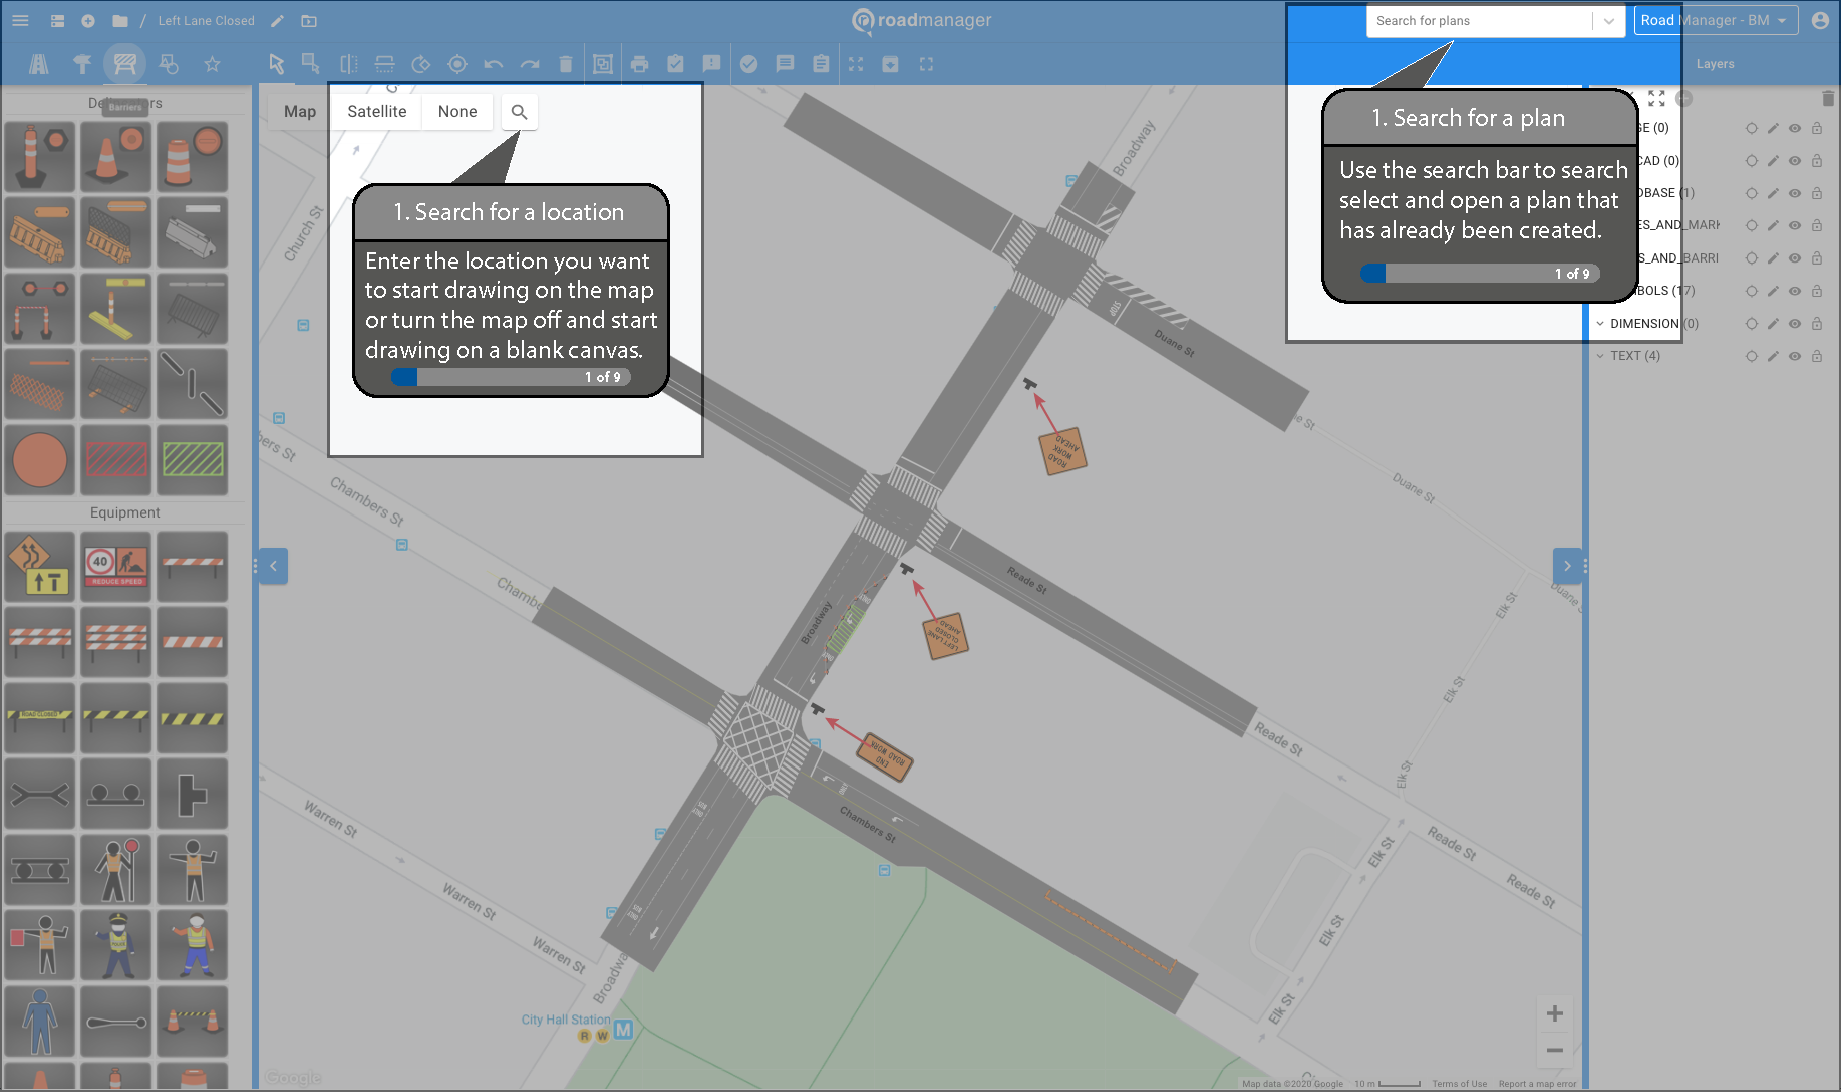
1. Search for a location
Enter the location you want to start drawing on the map or turn the map off and start drawing on a blank canvas.
Use the search bar to search select and open a plan that has already been created.

2. Tools & Signs
Use tools and signs to draw anywhere on the map. Signs will be generated from the location you are drawing on the map.
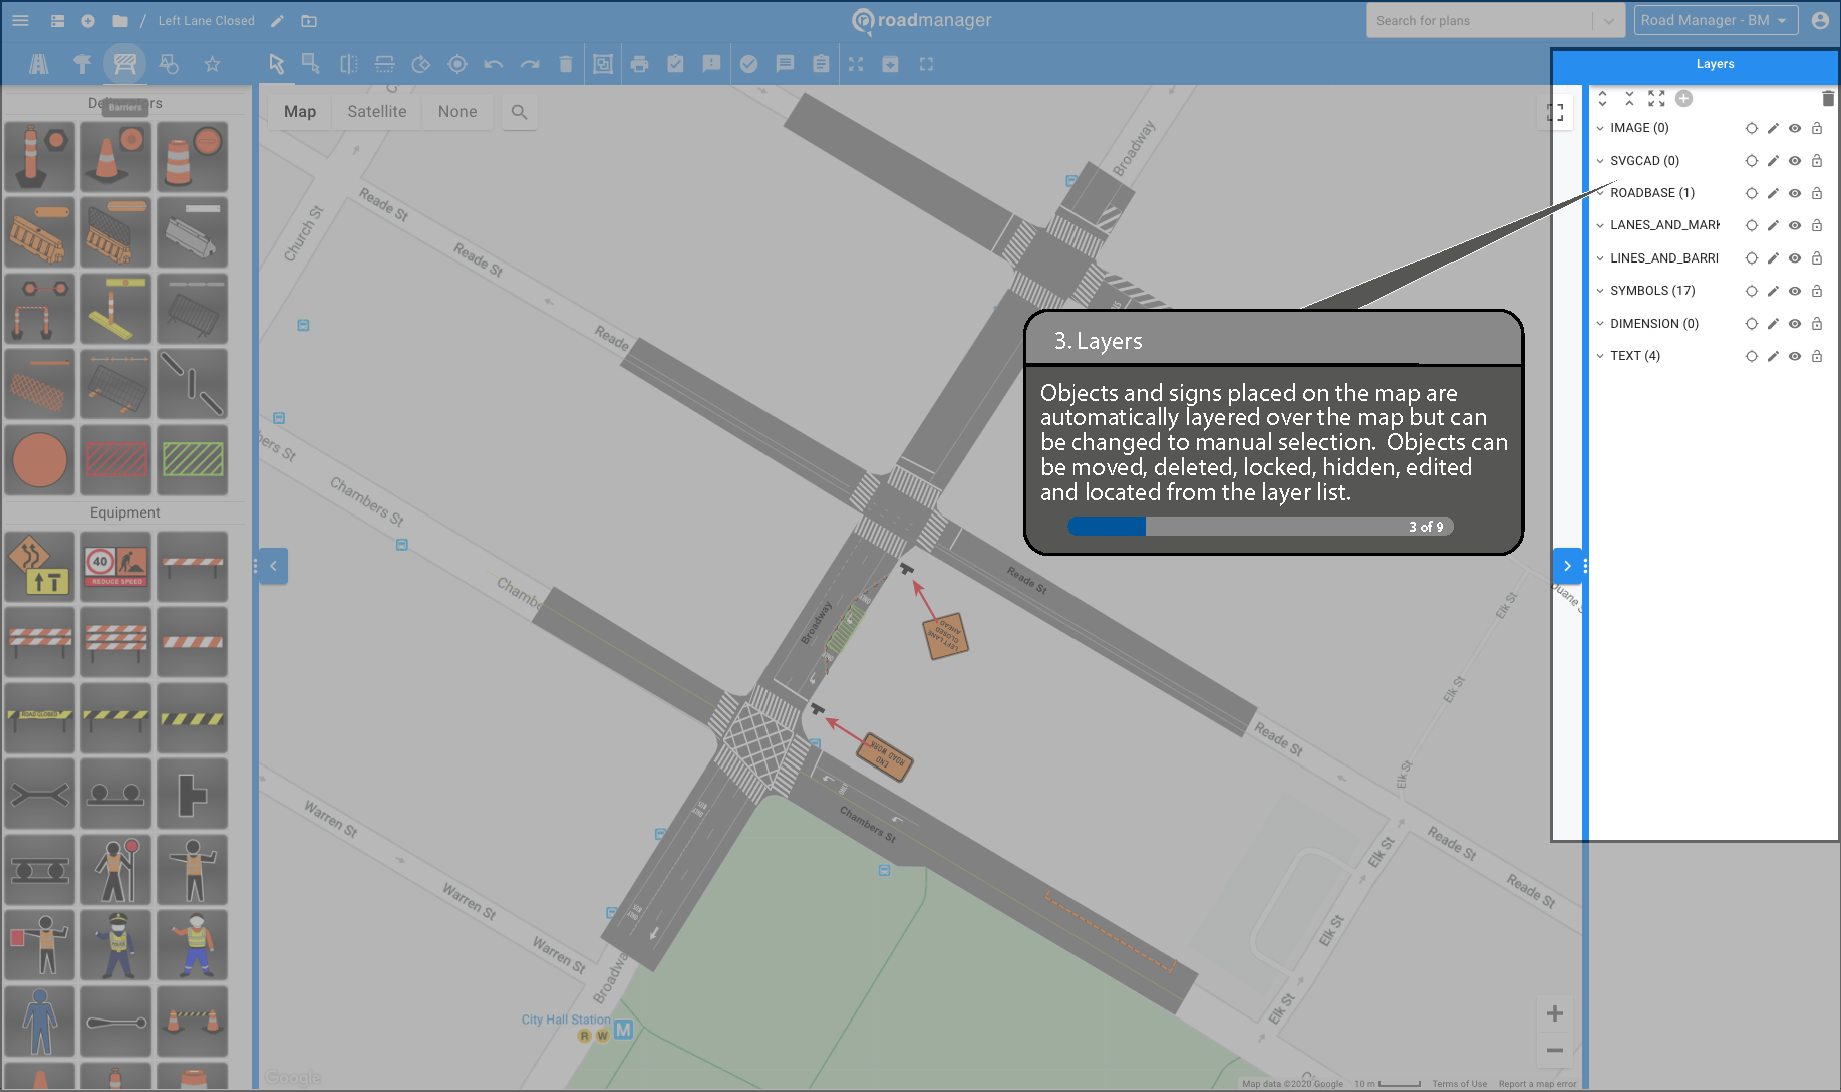
3. Layers
Objects and signs placed on the map are automatically layered over the map but can be changed to manual selection. Objects can be moved, dleted, locked, hidden, edited and located from the layer list.

4. Tool bar tools
Use tool bar tools to select and manipulate objects on the map. Access your task box, inventory and set default view for your plan so it opens at the set location every time. Set print regions and print plans.
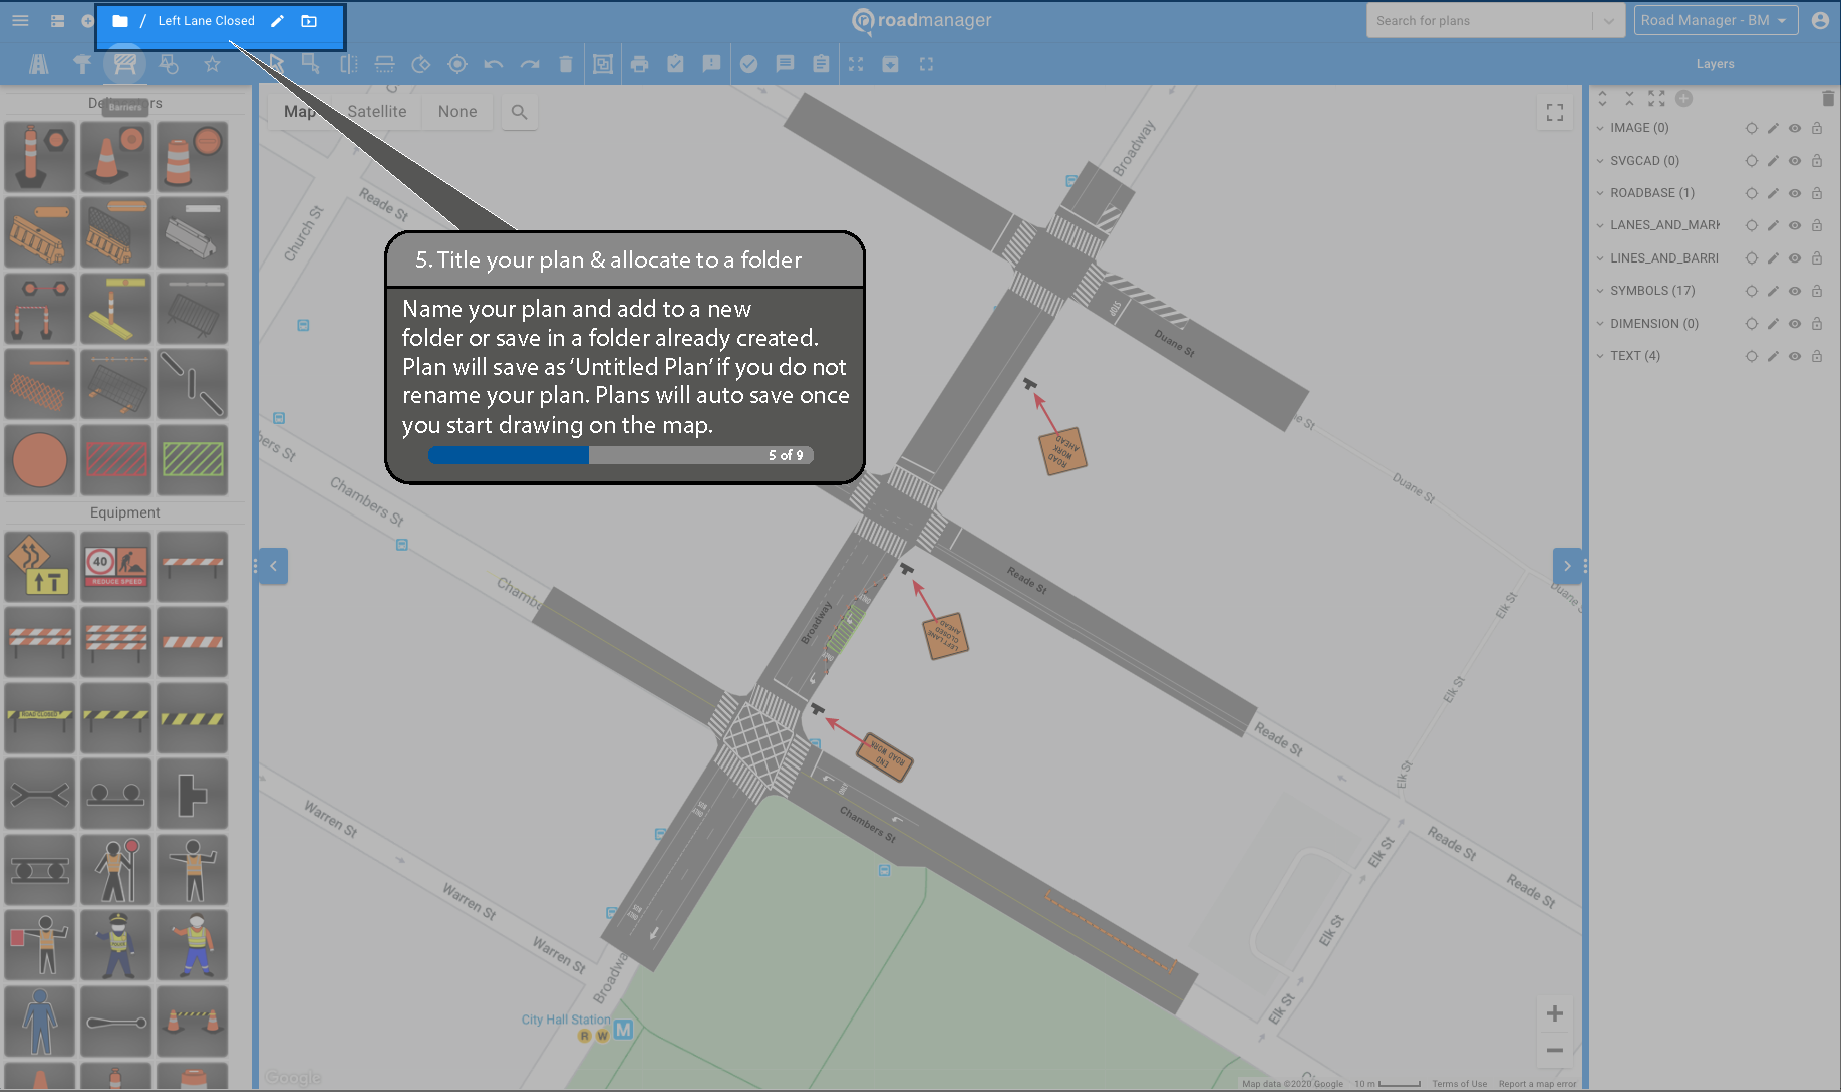
5. Title your plan & allocate to a folder
Name your plan and add to a new folder or save in a folder already created. Plan will save as ‘Untitled Plan’ if you do not rename your plan. Plans will auto save once you start drawing on the map.
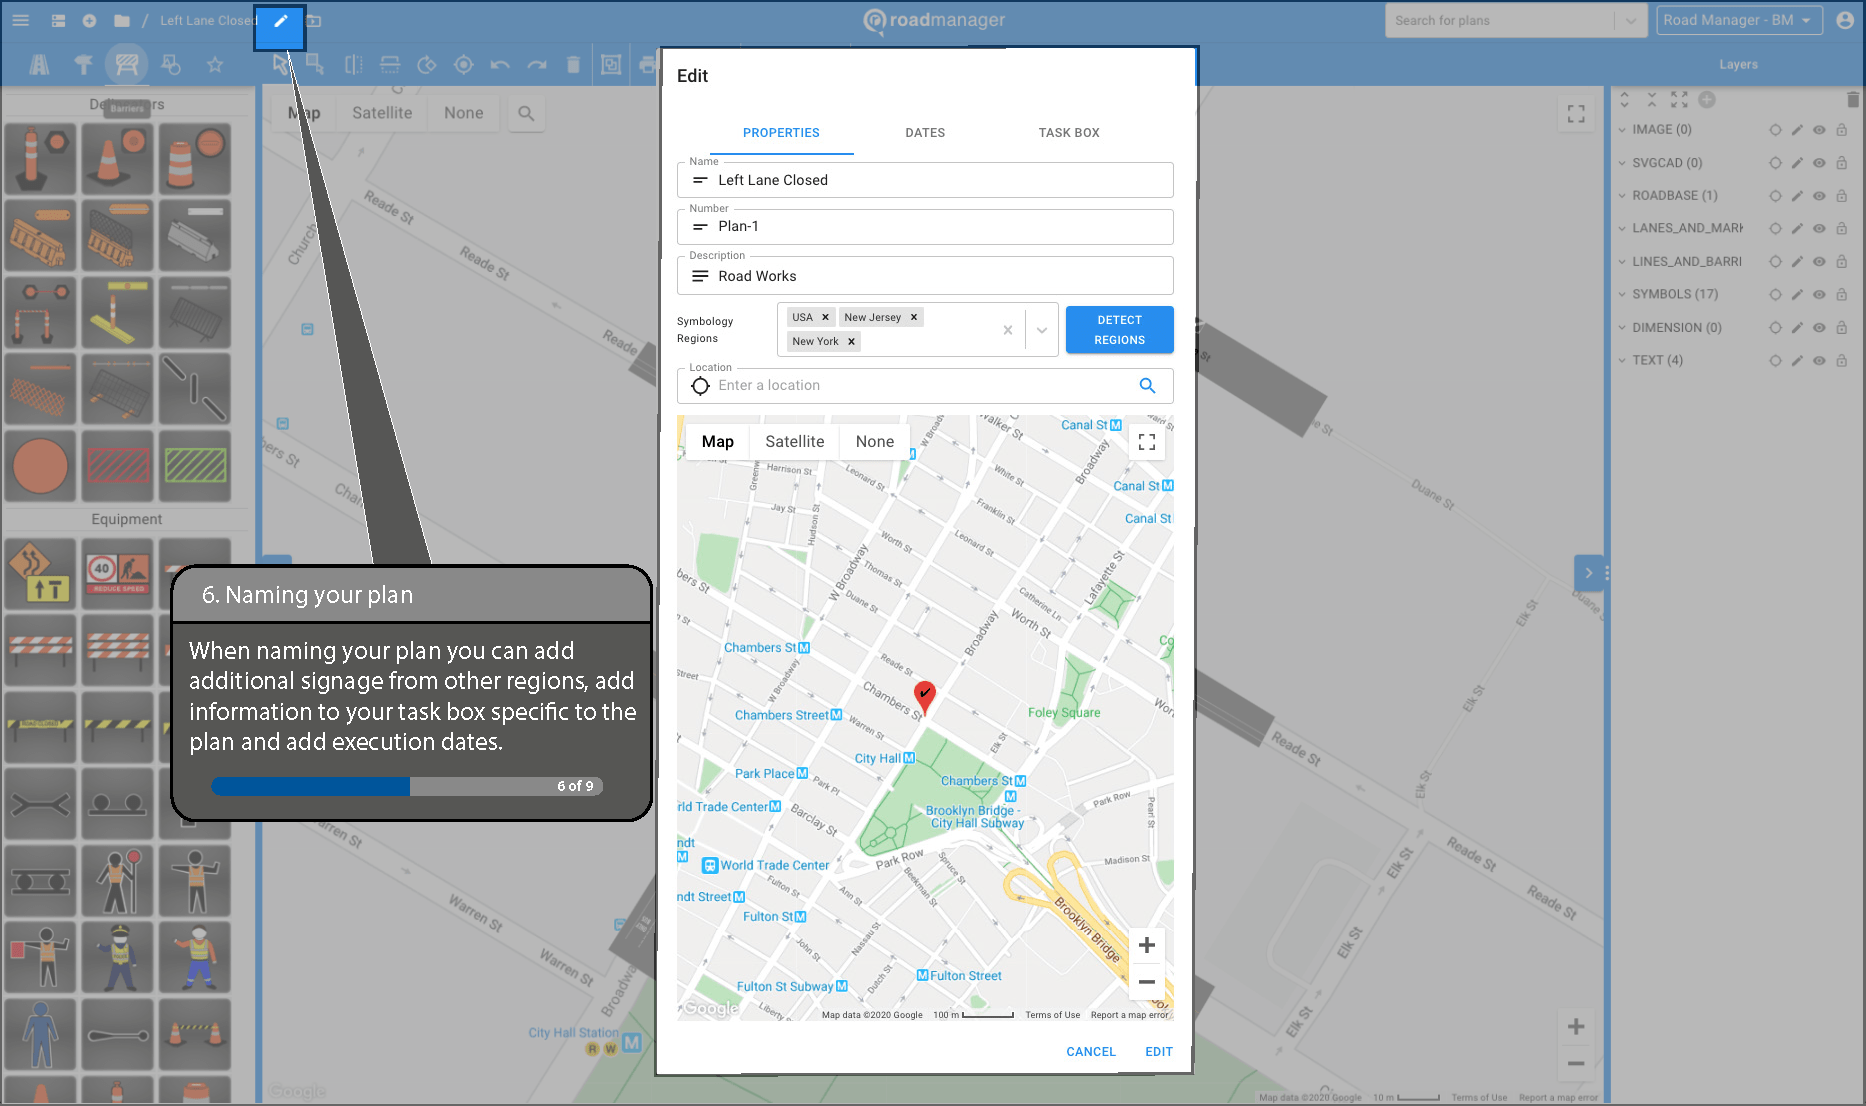
6. Naming your plan
When naming your plan you can add additional signage from other regions, add information to your task box specific to the plan and add execution dates.
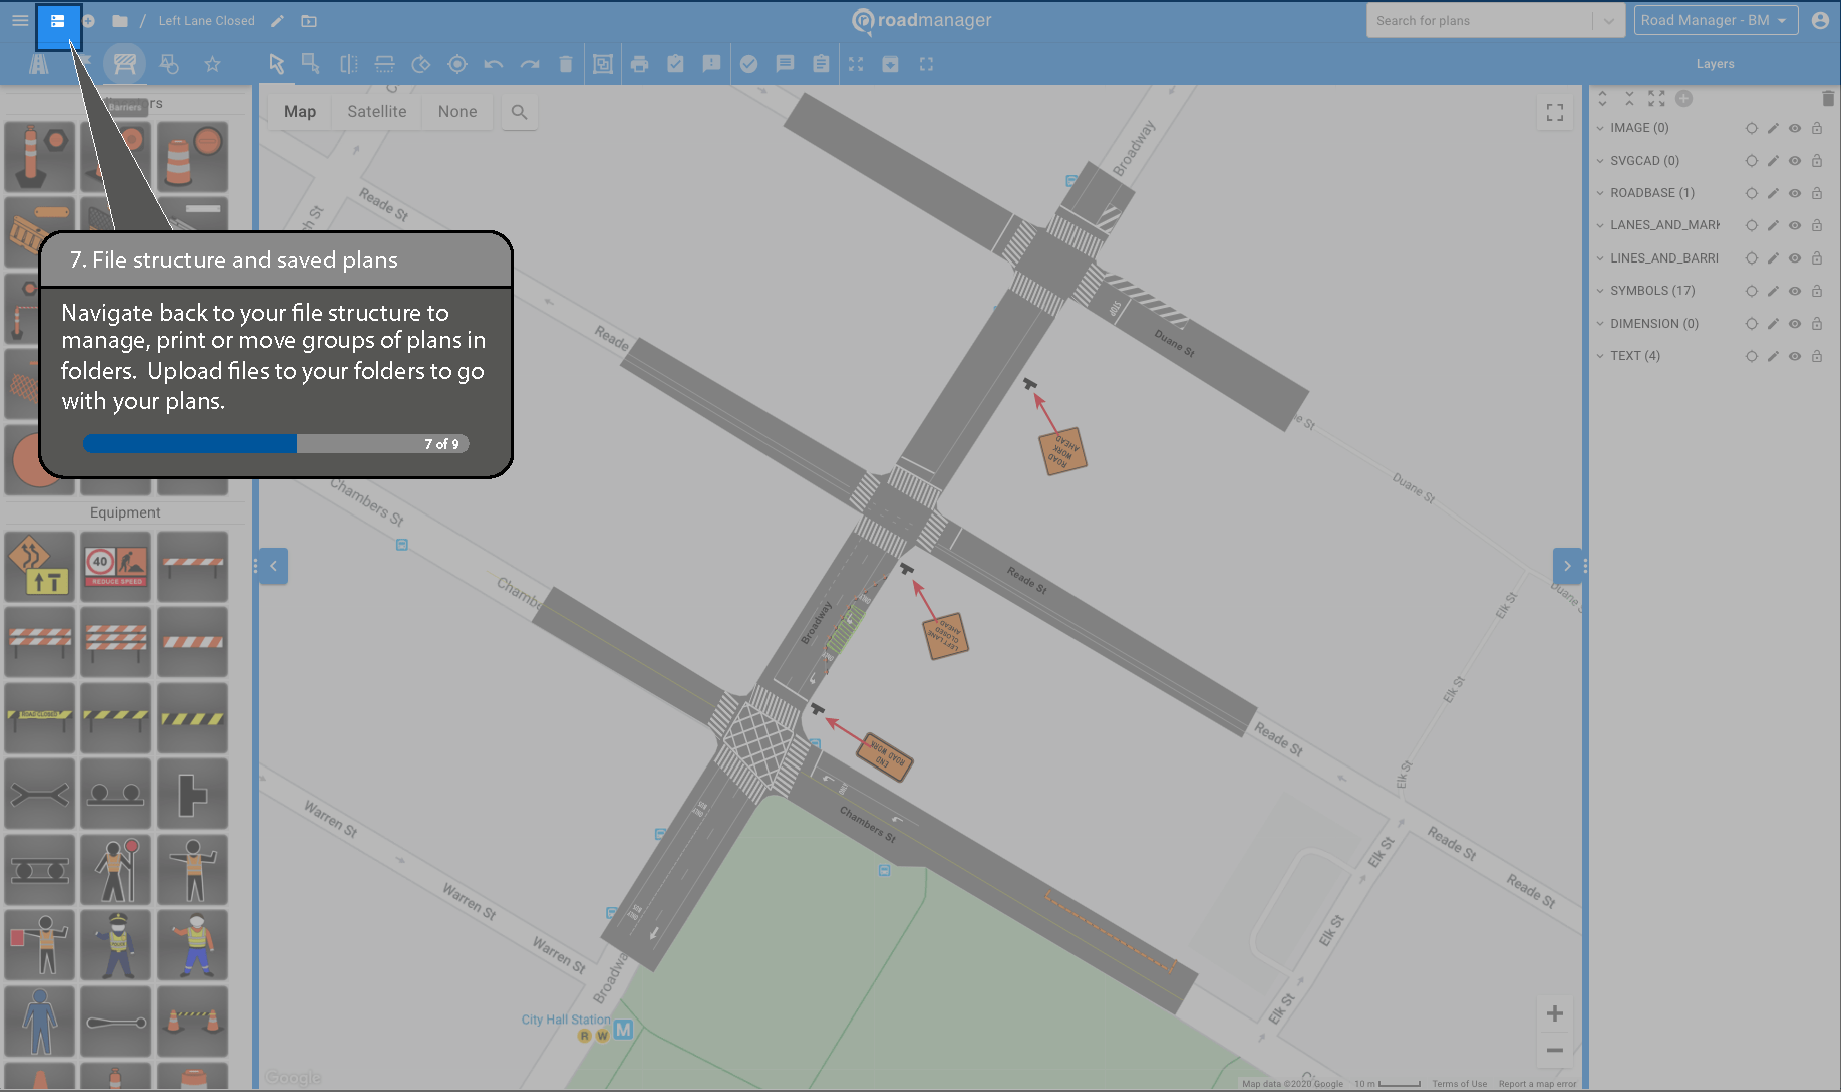
7. File structure and saved plans
Navigate back to your file structure to manage, print or move groups of plans in folders. Upload files to your folders to go with your plans.
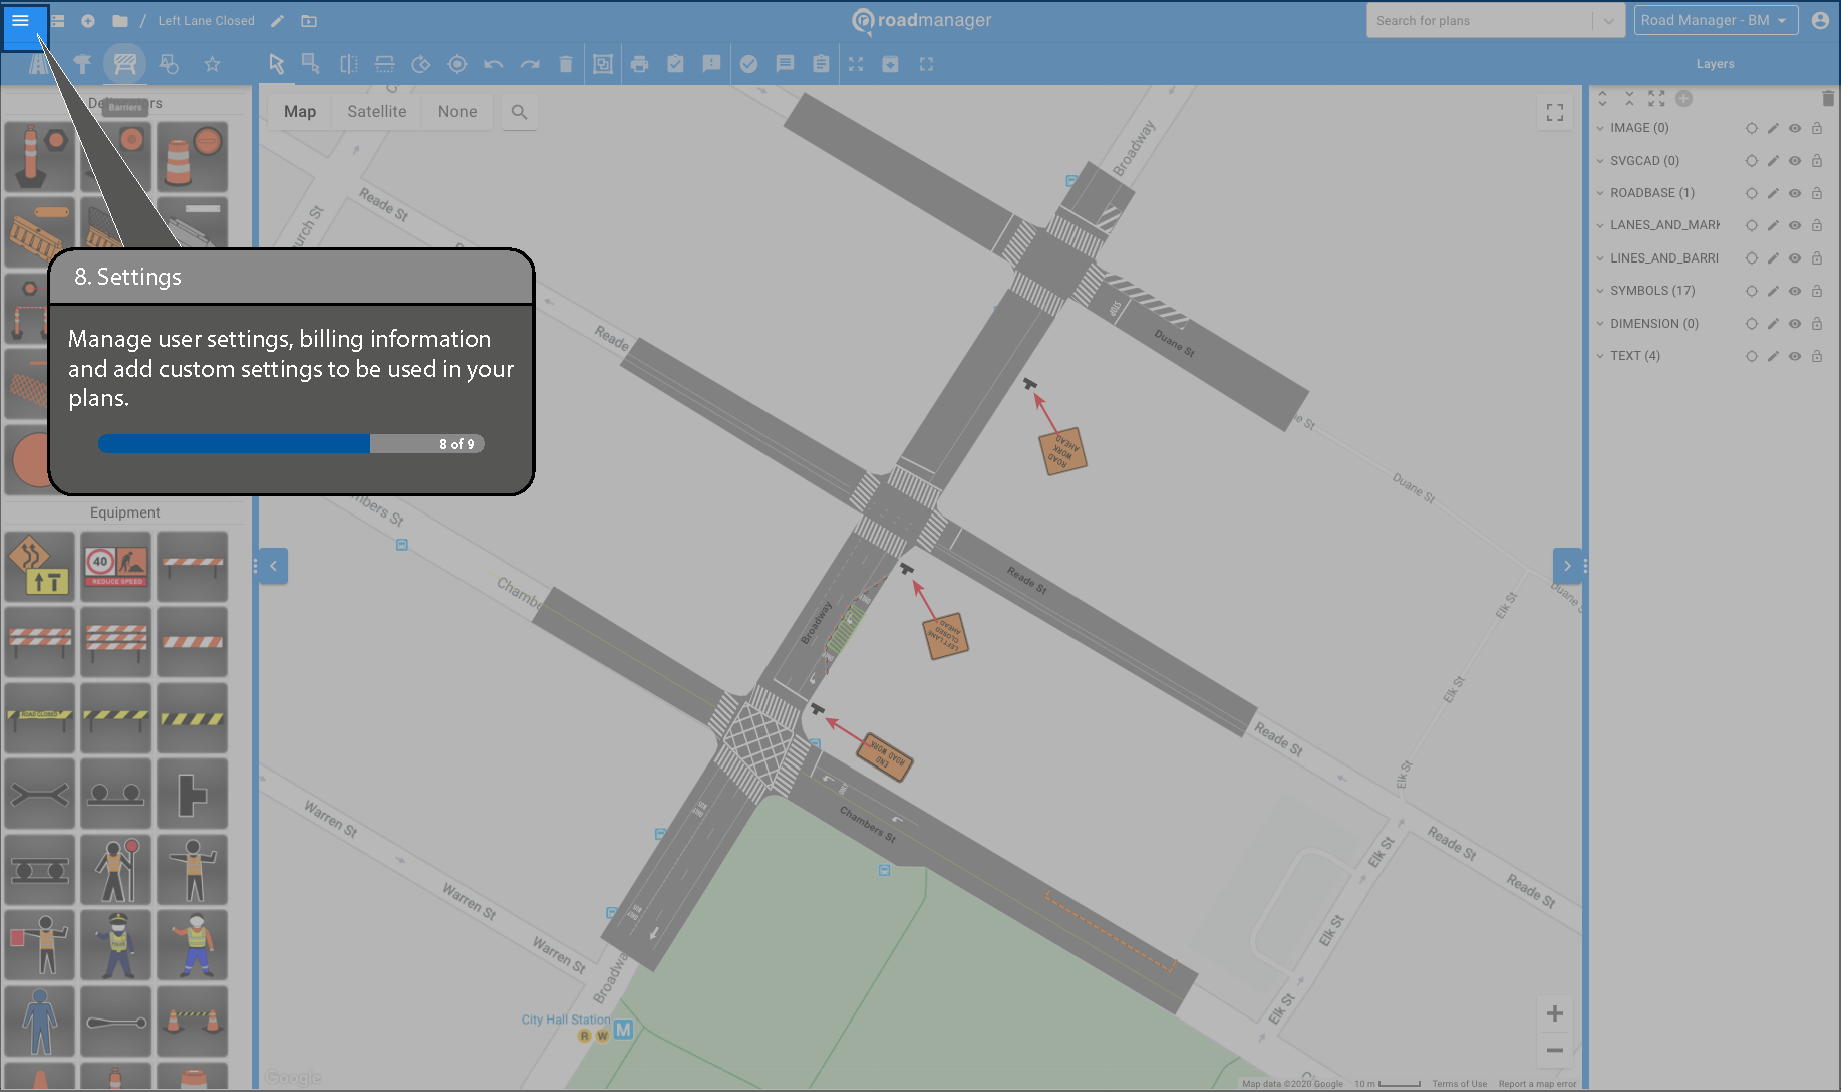
8. Settings
Manage user settings, billing information and add custom settings to be used in your plans.
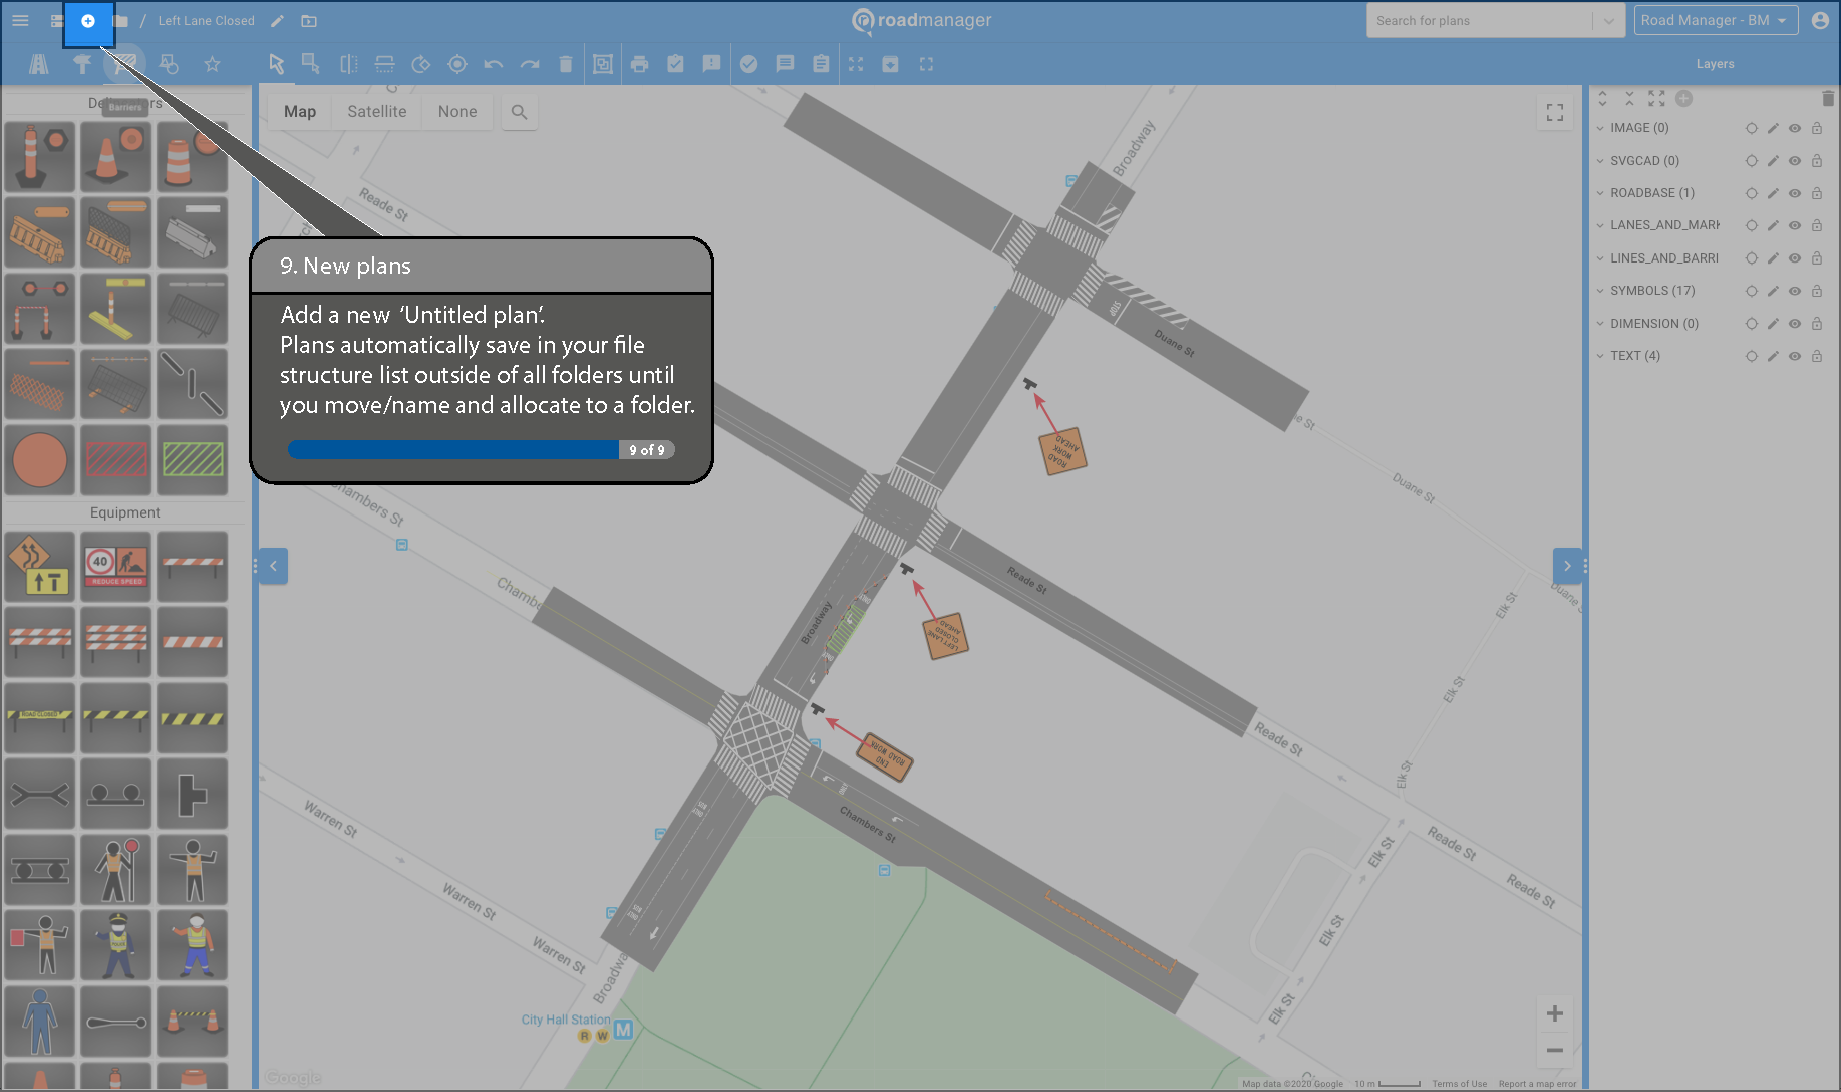
9. New plans
Add a new ‘Untitled plan’. Plans automatically save in your file structure list outside of all folders until you move/name and allocate to a folder.
My Plans Screen
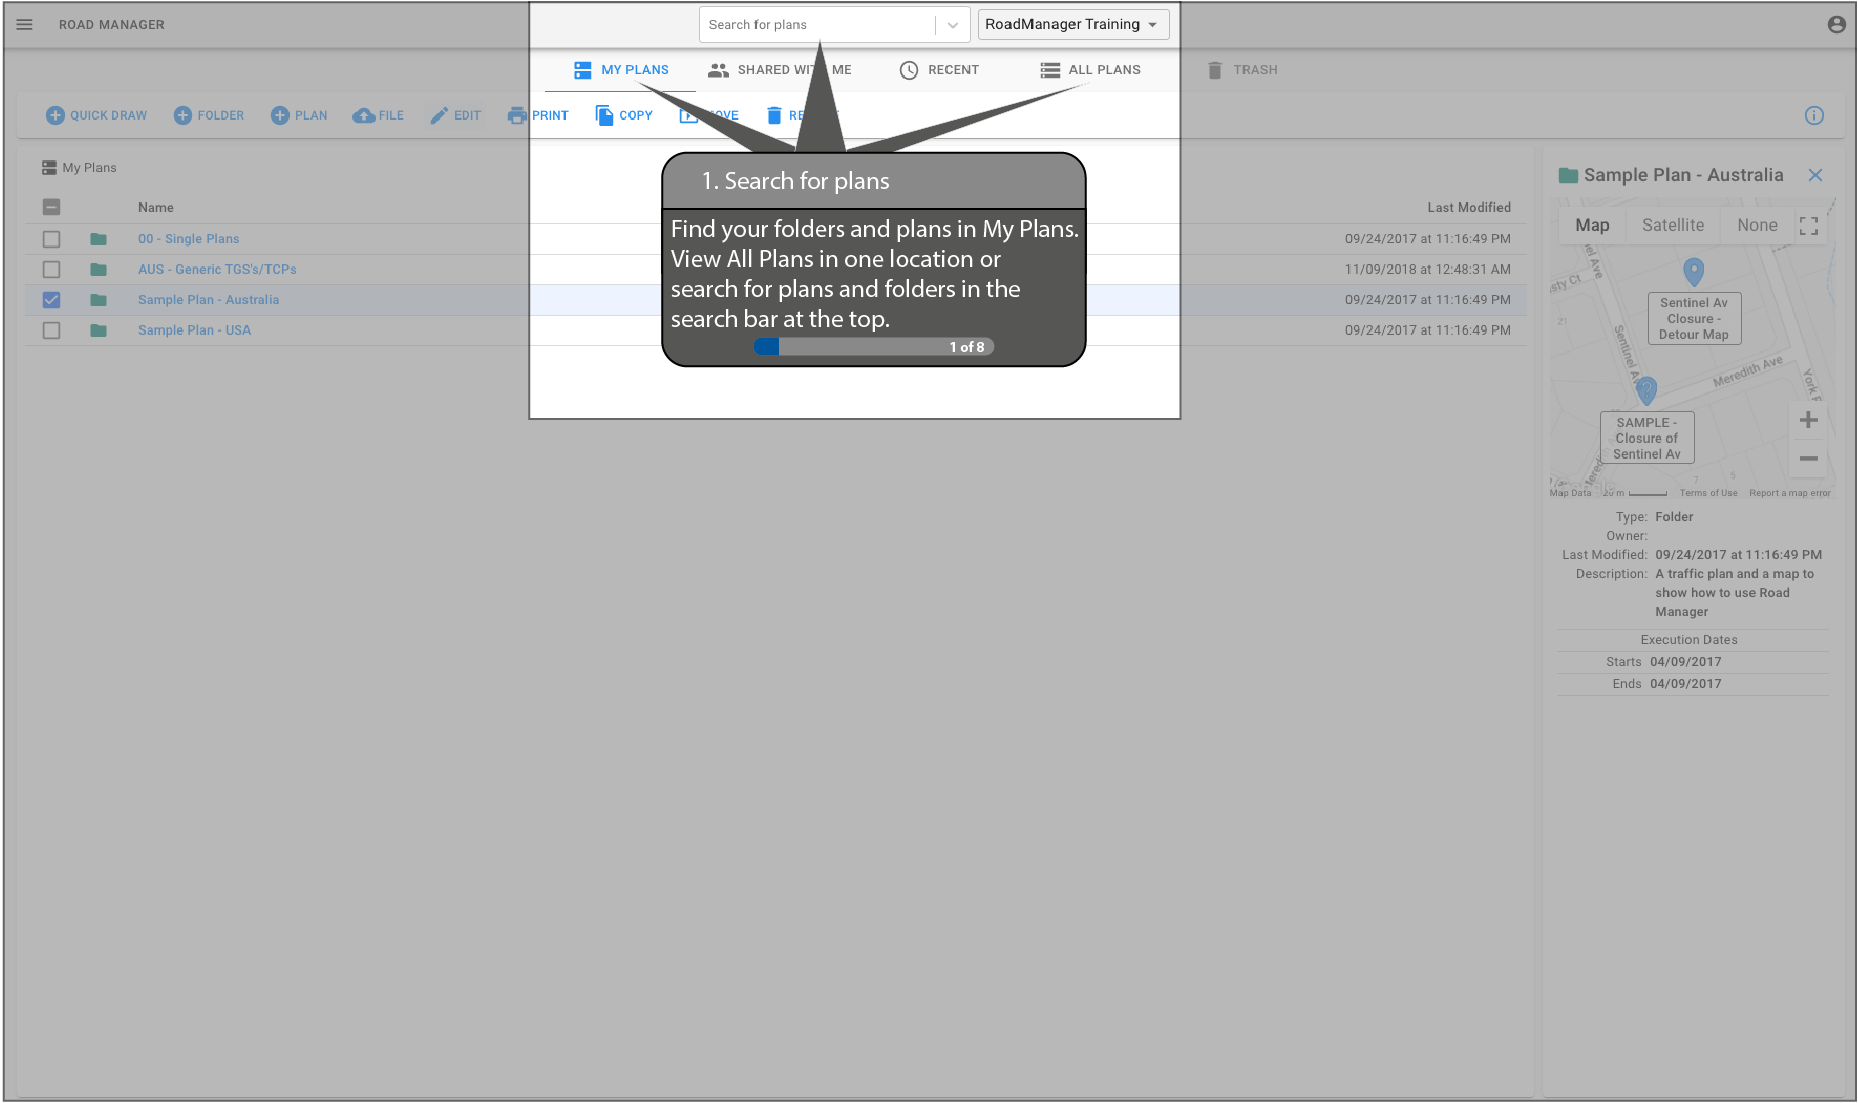
1. Search for plans
Find your folders and plans in My Plans. View All Plans in one location or search for plans and folders in the search bar at the top.
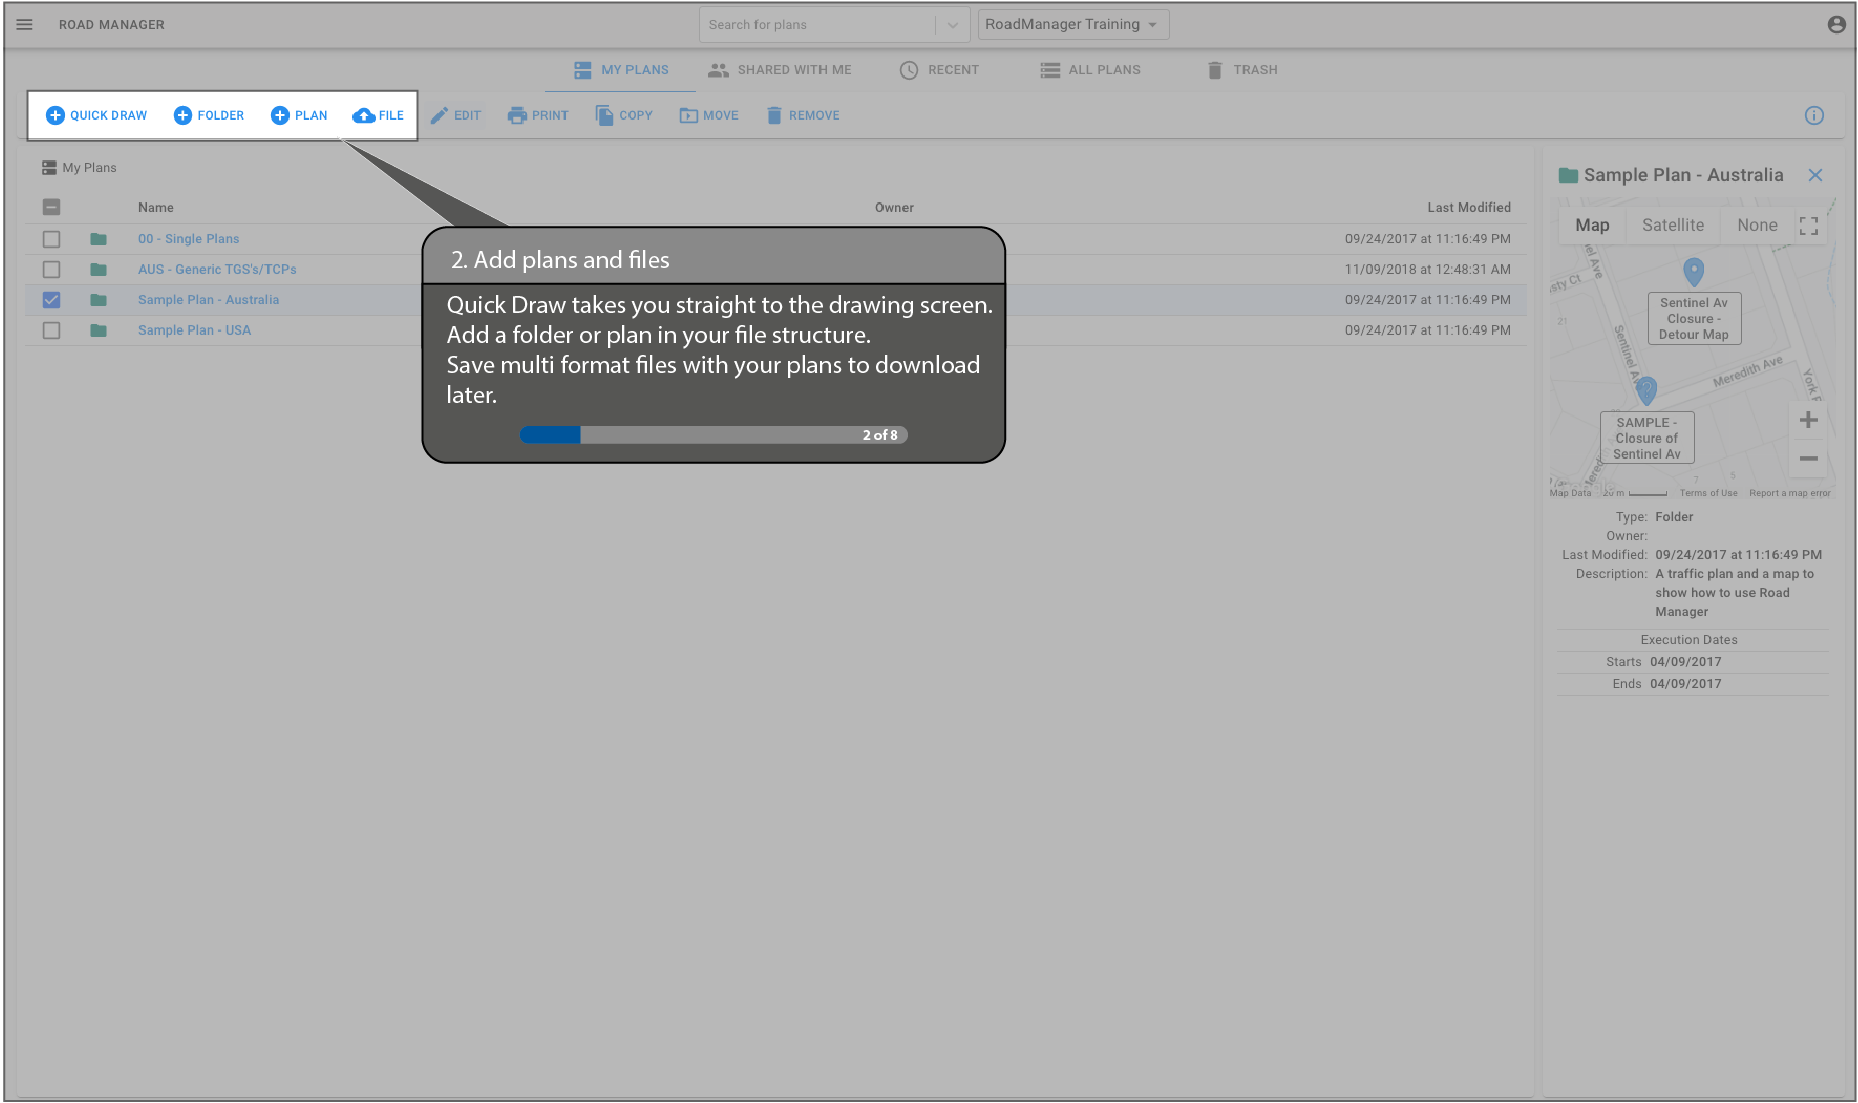
2. Add plans and files
Quick Draw takes you straight to the drawing screen. Add a folder or plan in your file structure. Save multi format files with your plans to download later.
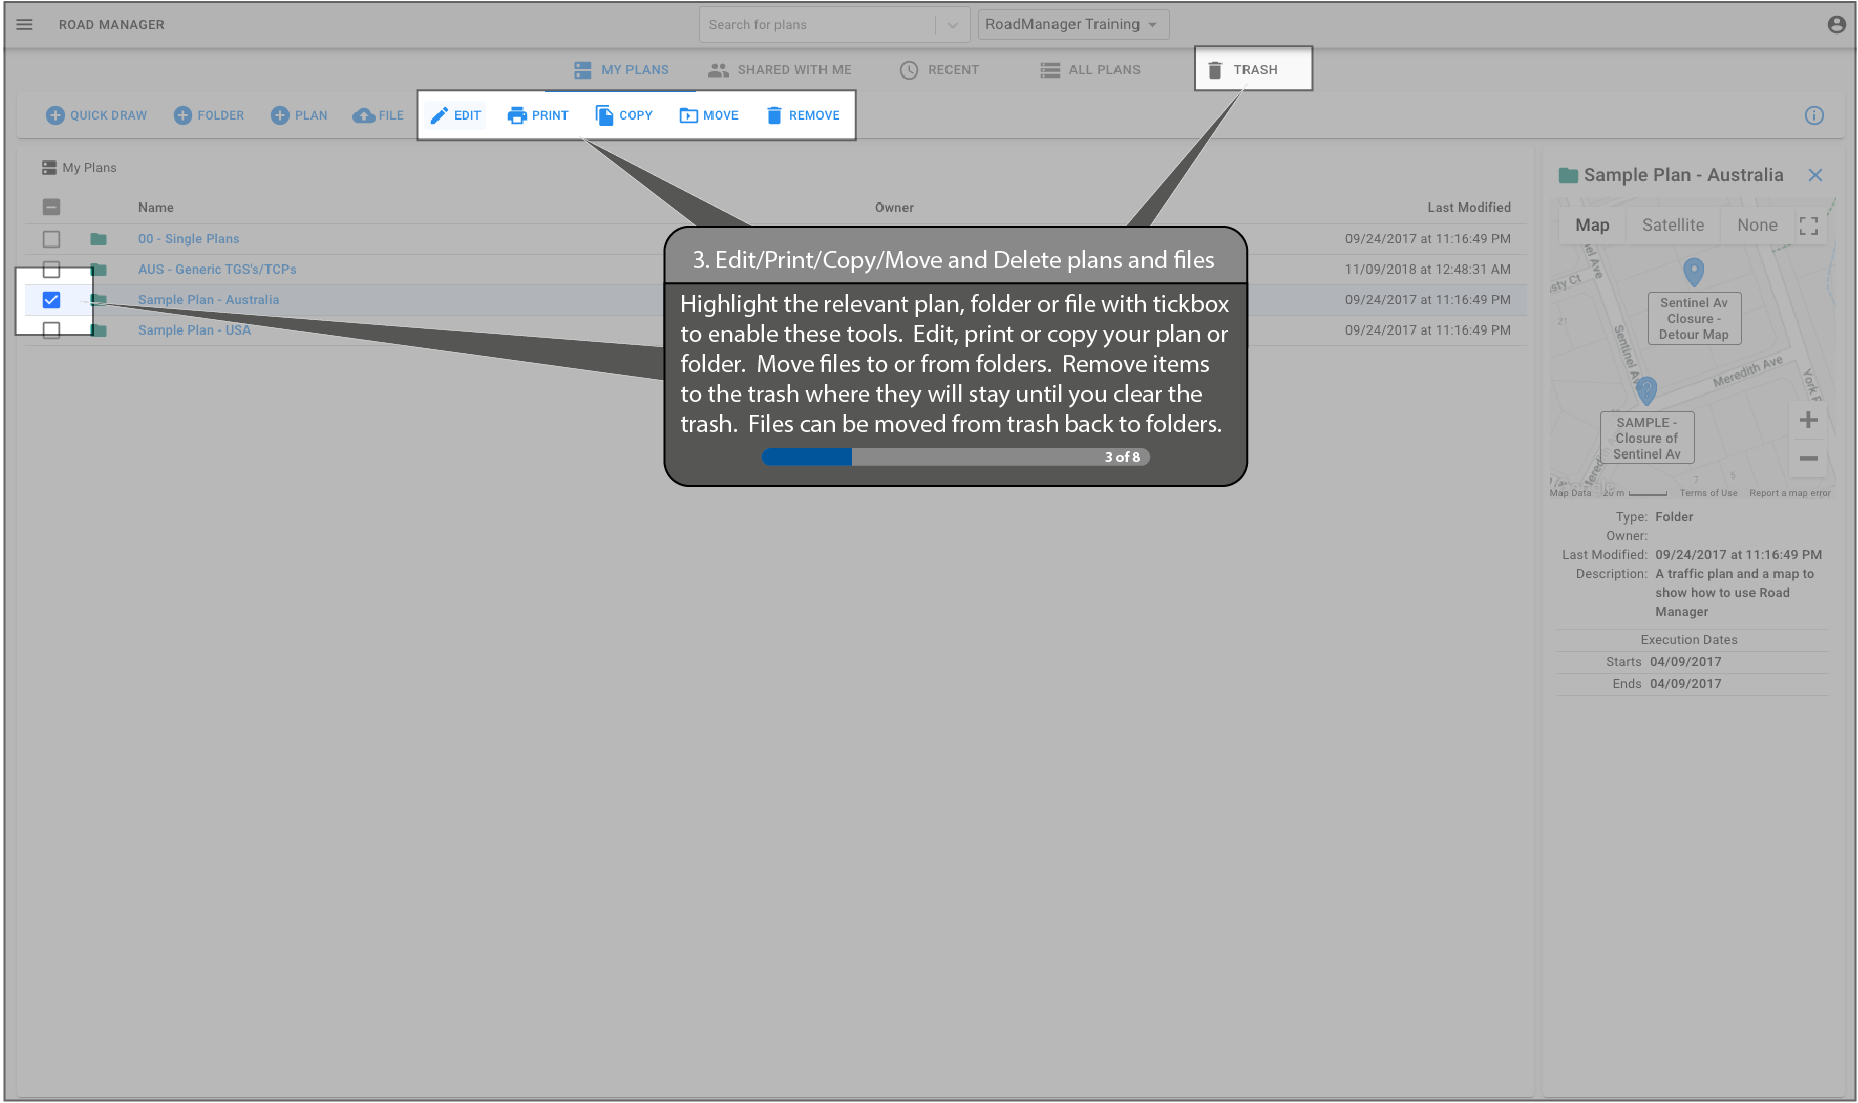
3. Edit/Print/Copy/Move and Delete plans and files
Highlight the relevant plan, folder or file with tickbox to enable these tools. Edit, print or copy your plan or folder. Move files to or from folders. Remove items to the trash where they will stay until you clear the trash. Files can be moved from trash back to folders.
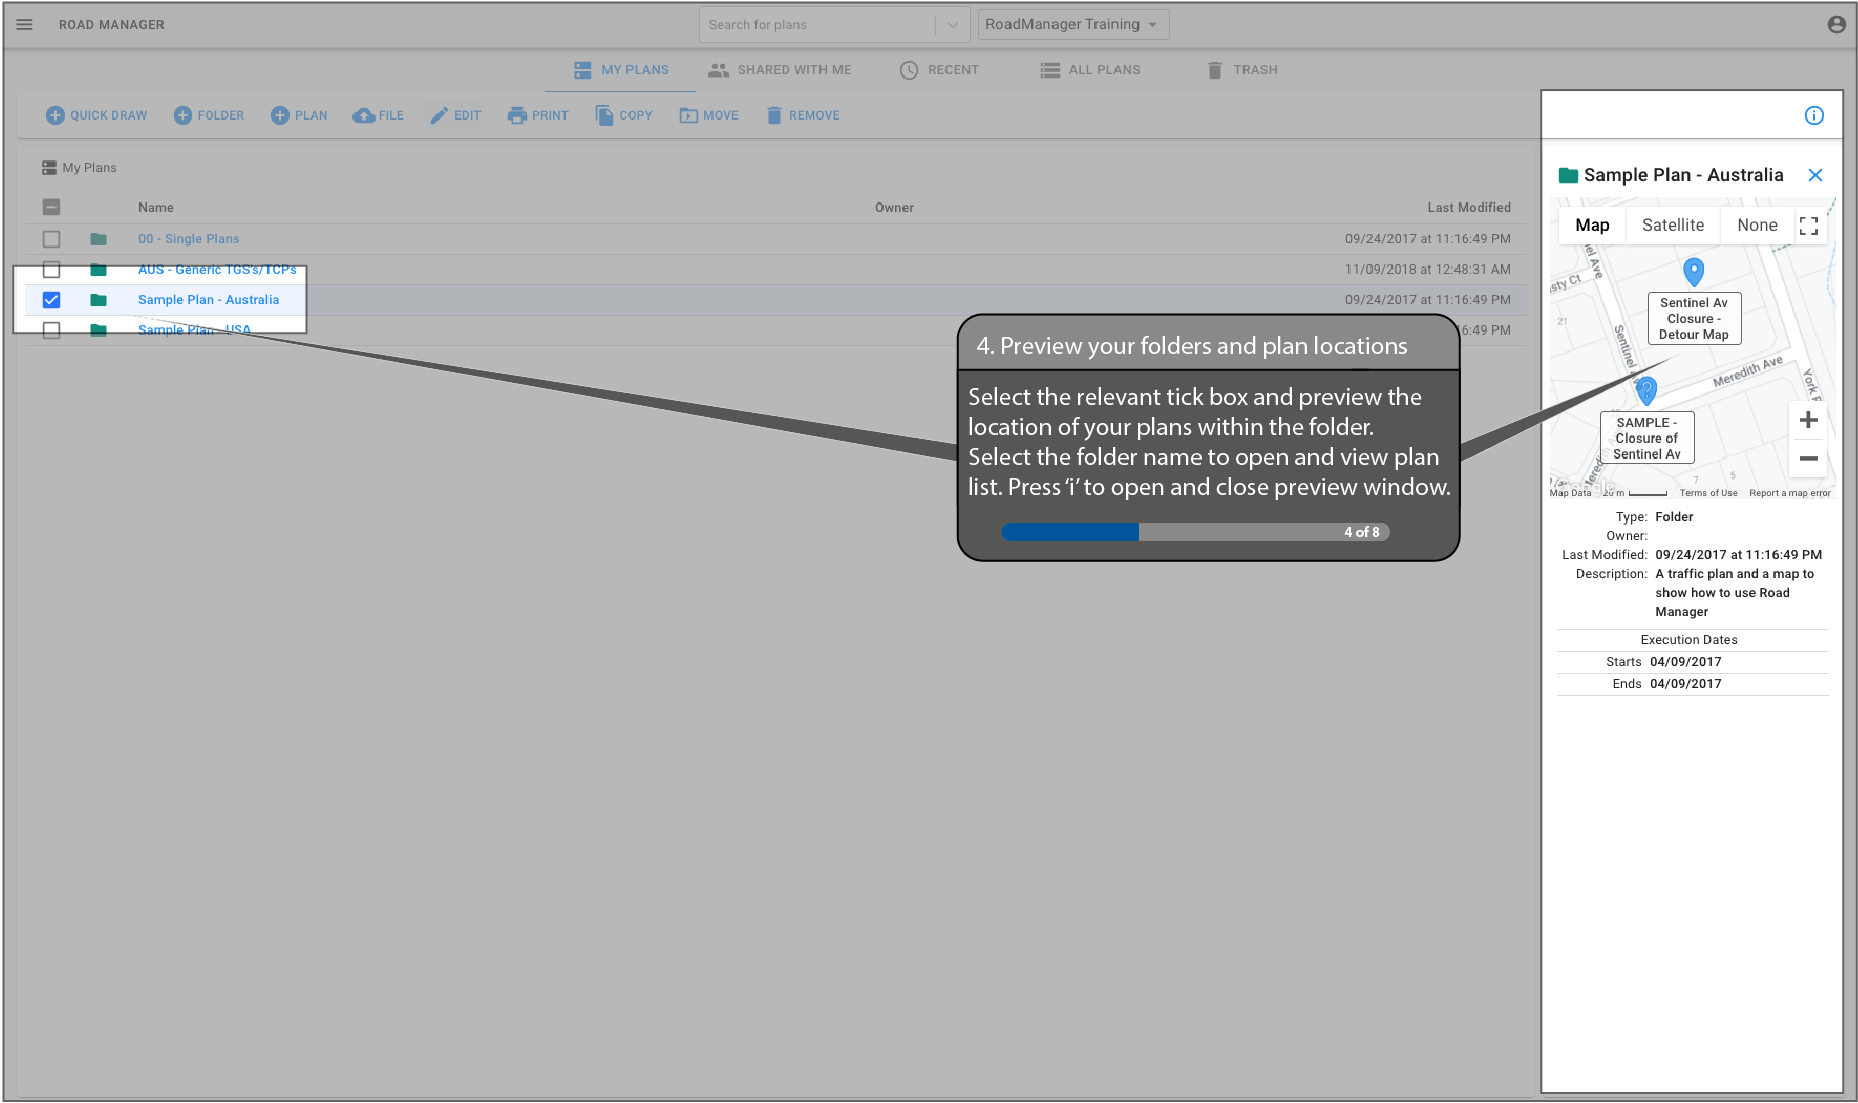
4. Preview your folders and plan locations
Select the relevant tick box and preview the location of your plans within the folder. Select the folder name to open and view plan list. Press ‘i’ to open and close preview window.
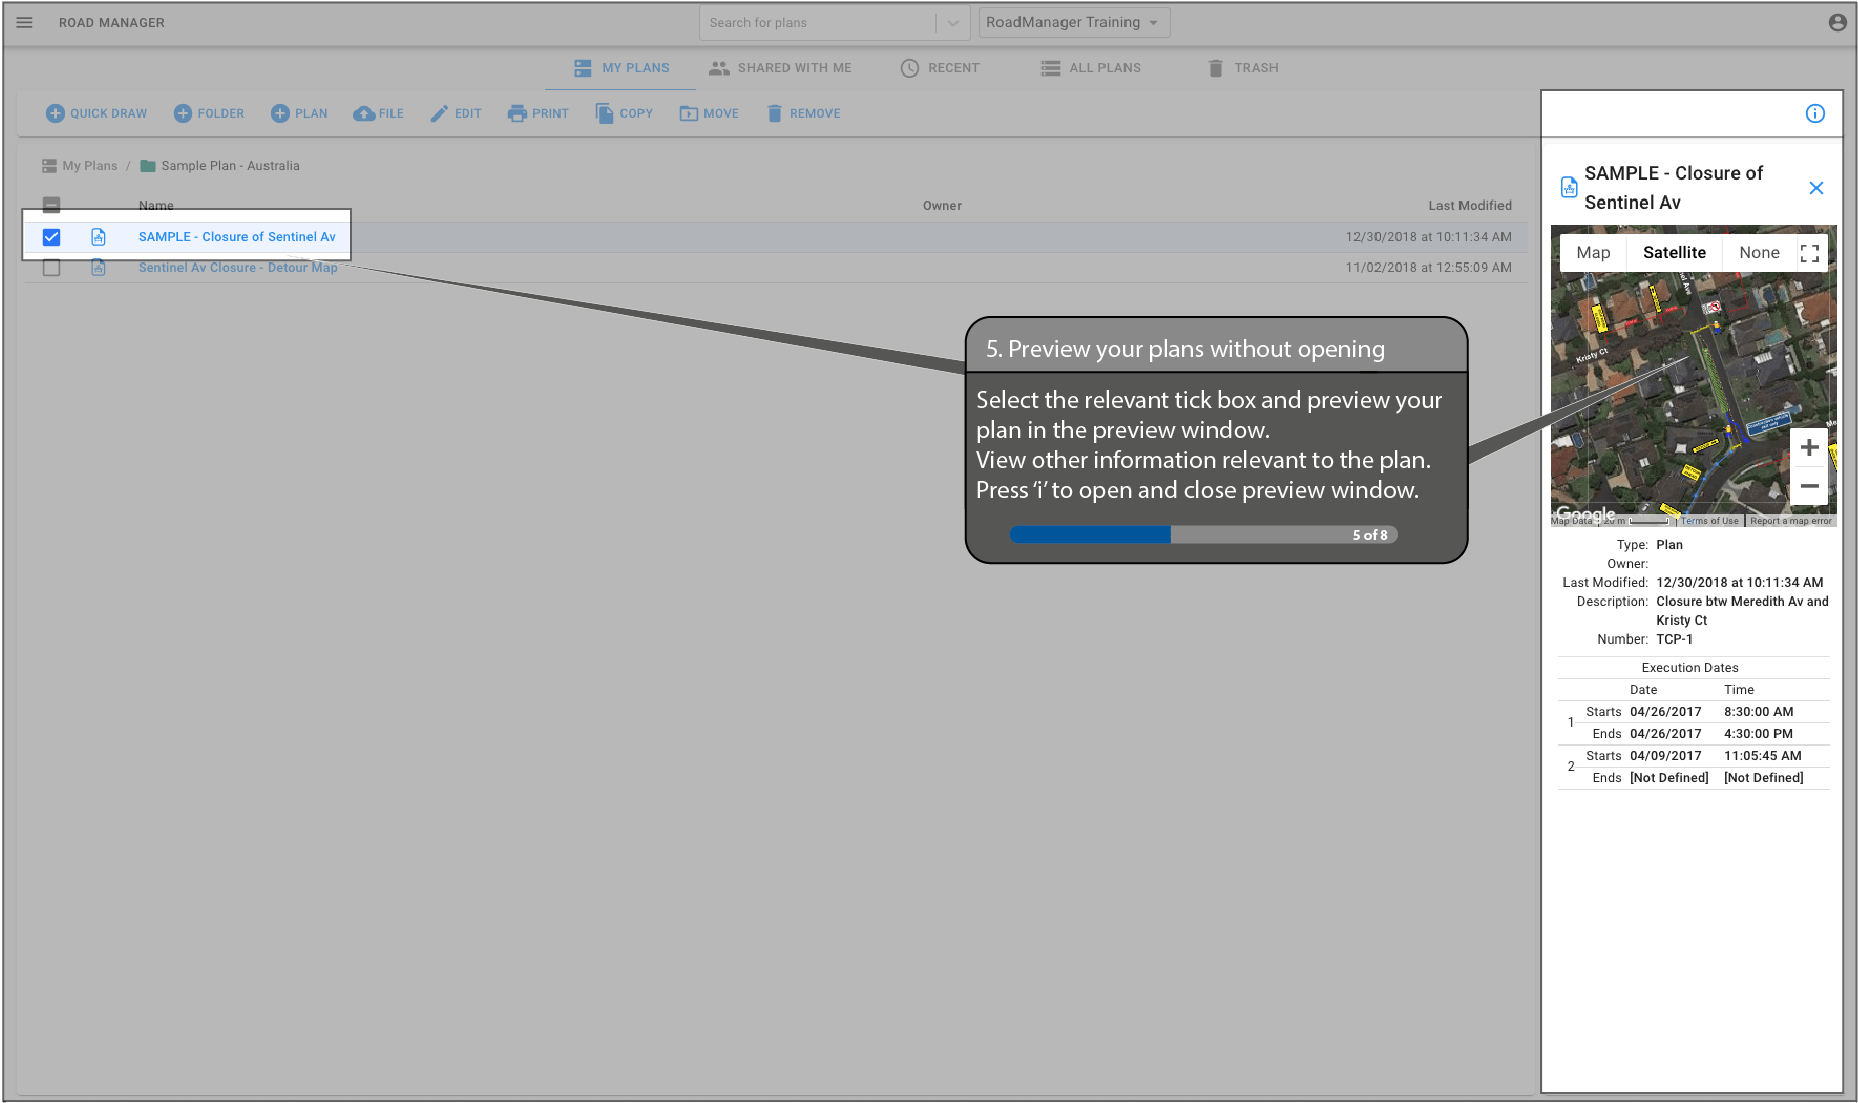
5. Preview your plans without opening
Select the relevant tick box and preview your plan in the preview window. View other information relevant to the plan. Press ‘i’ to open and close preview window.
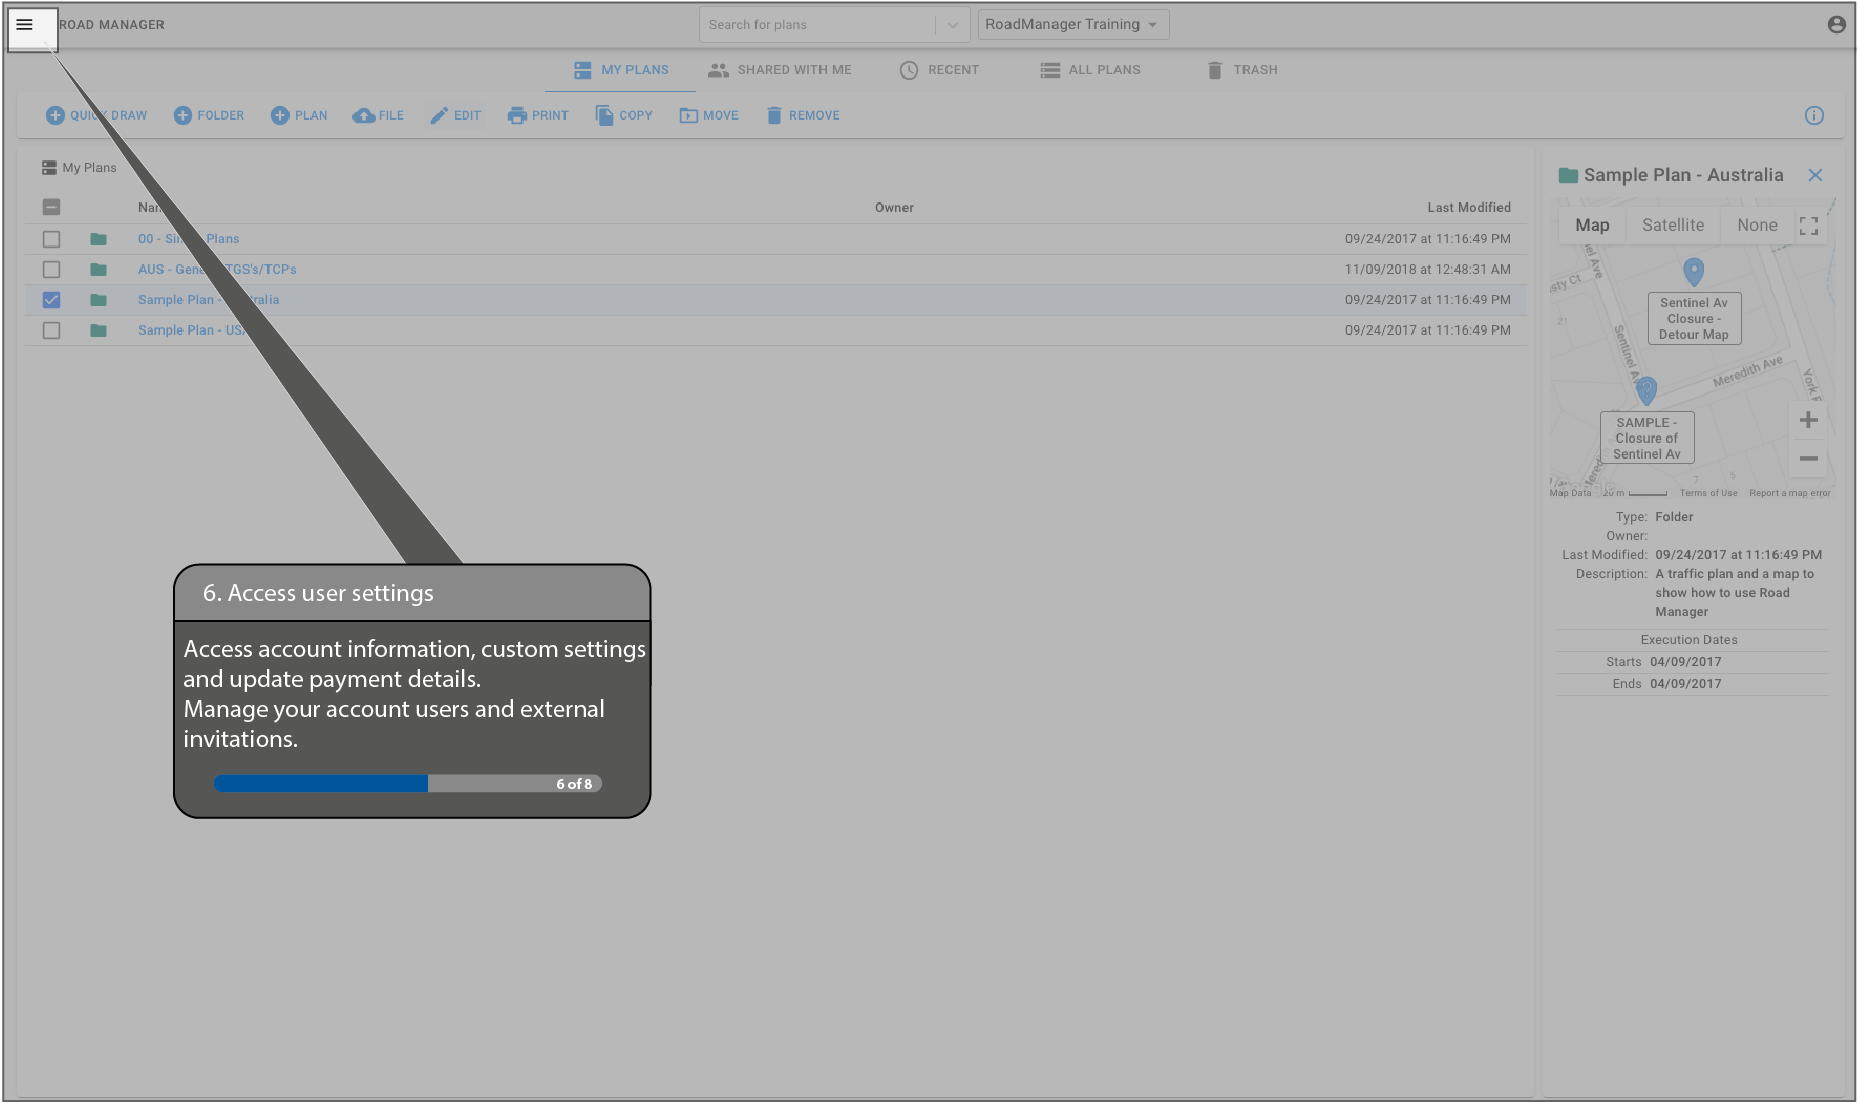
6. Access user settings
Access account information, custom settings and update payment details. Manage your account users and external invitations.
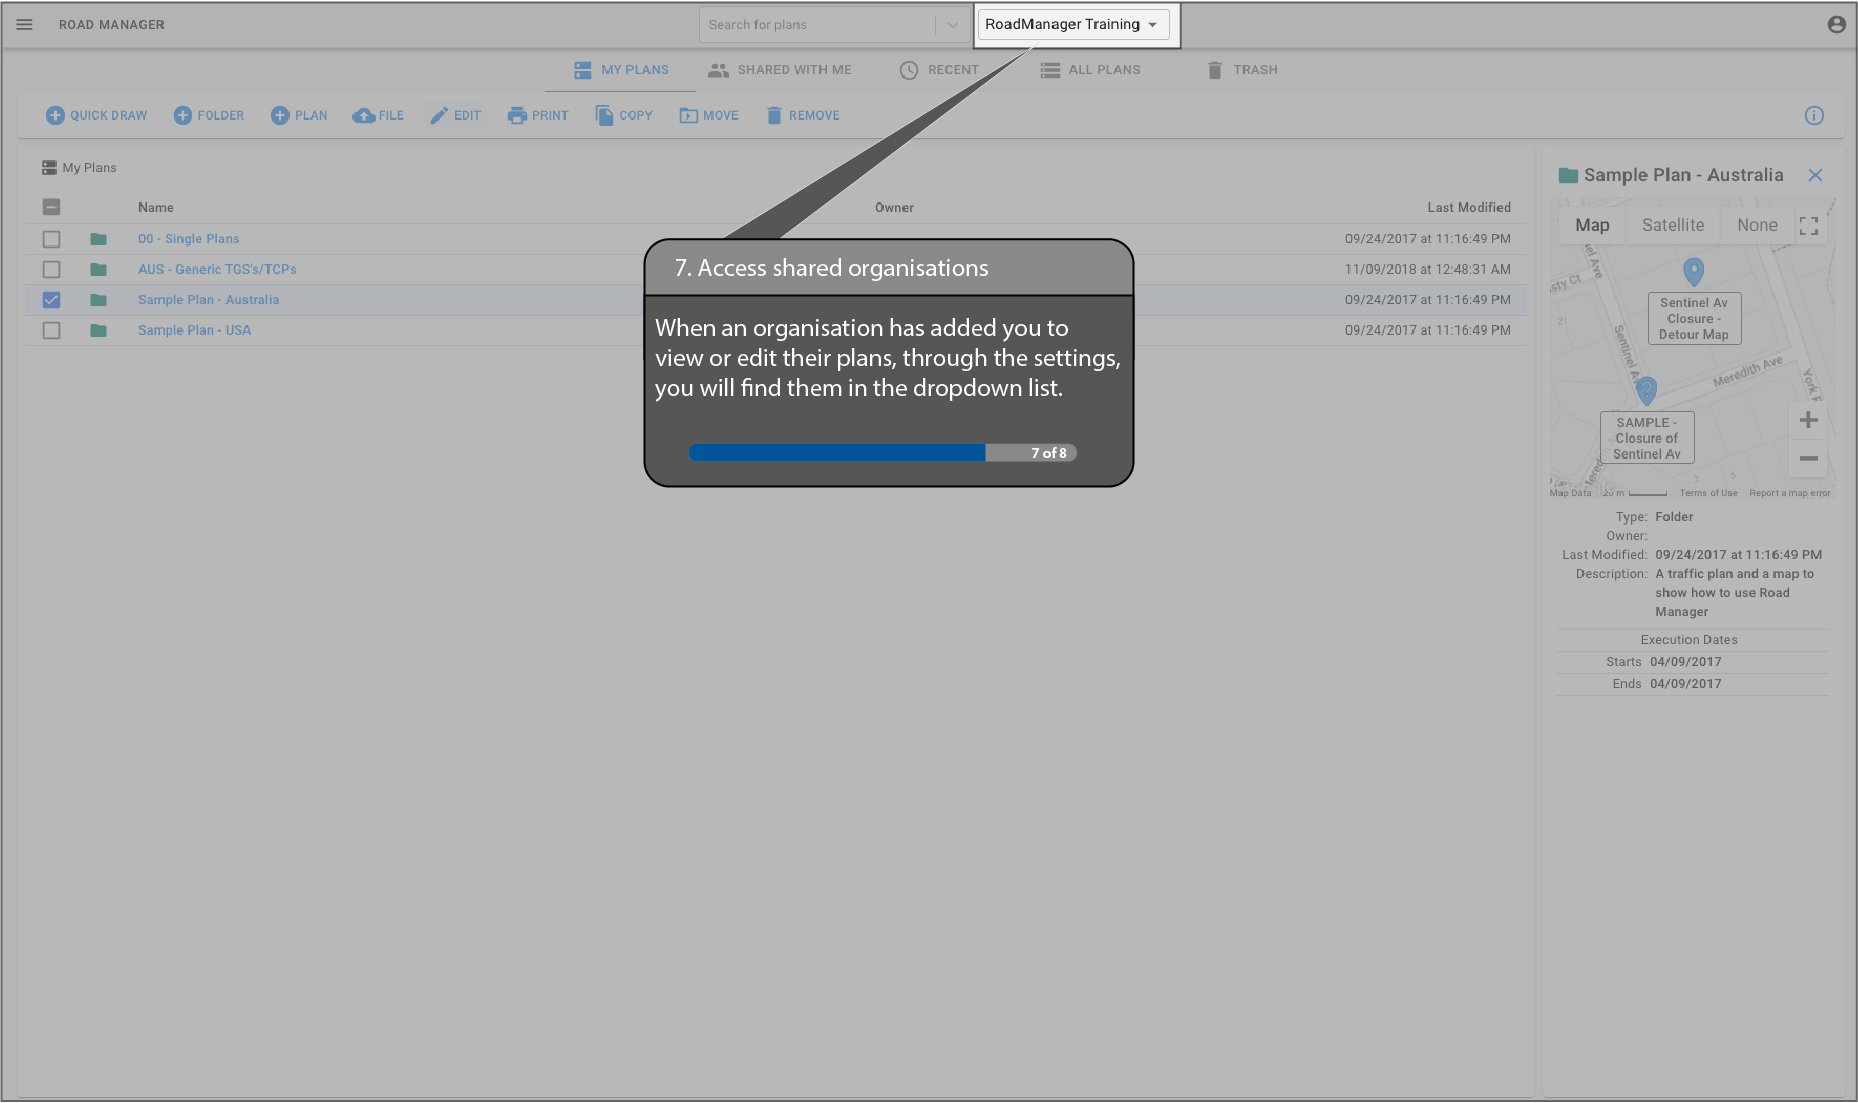
7. Access shared organisations
When an organisation has added you to view or edit their plans, through the settings, you will find them in the dropdown list.
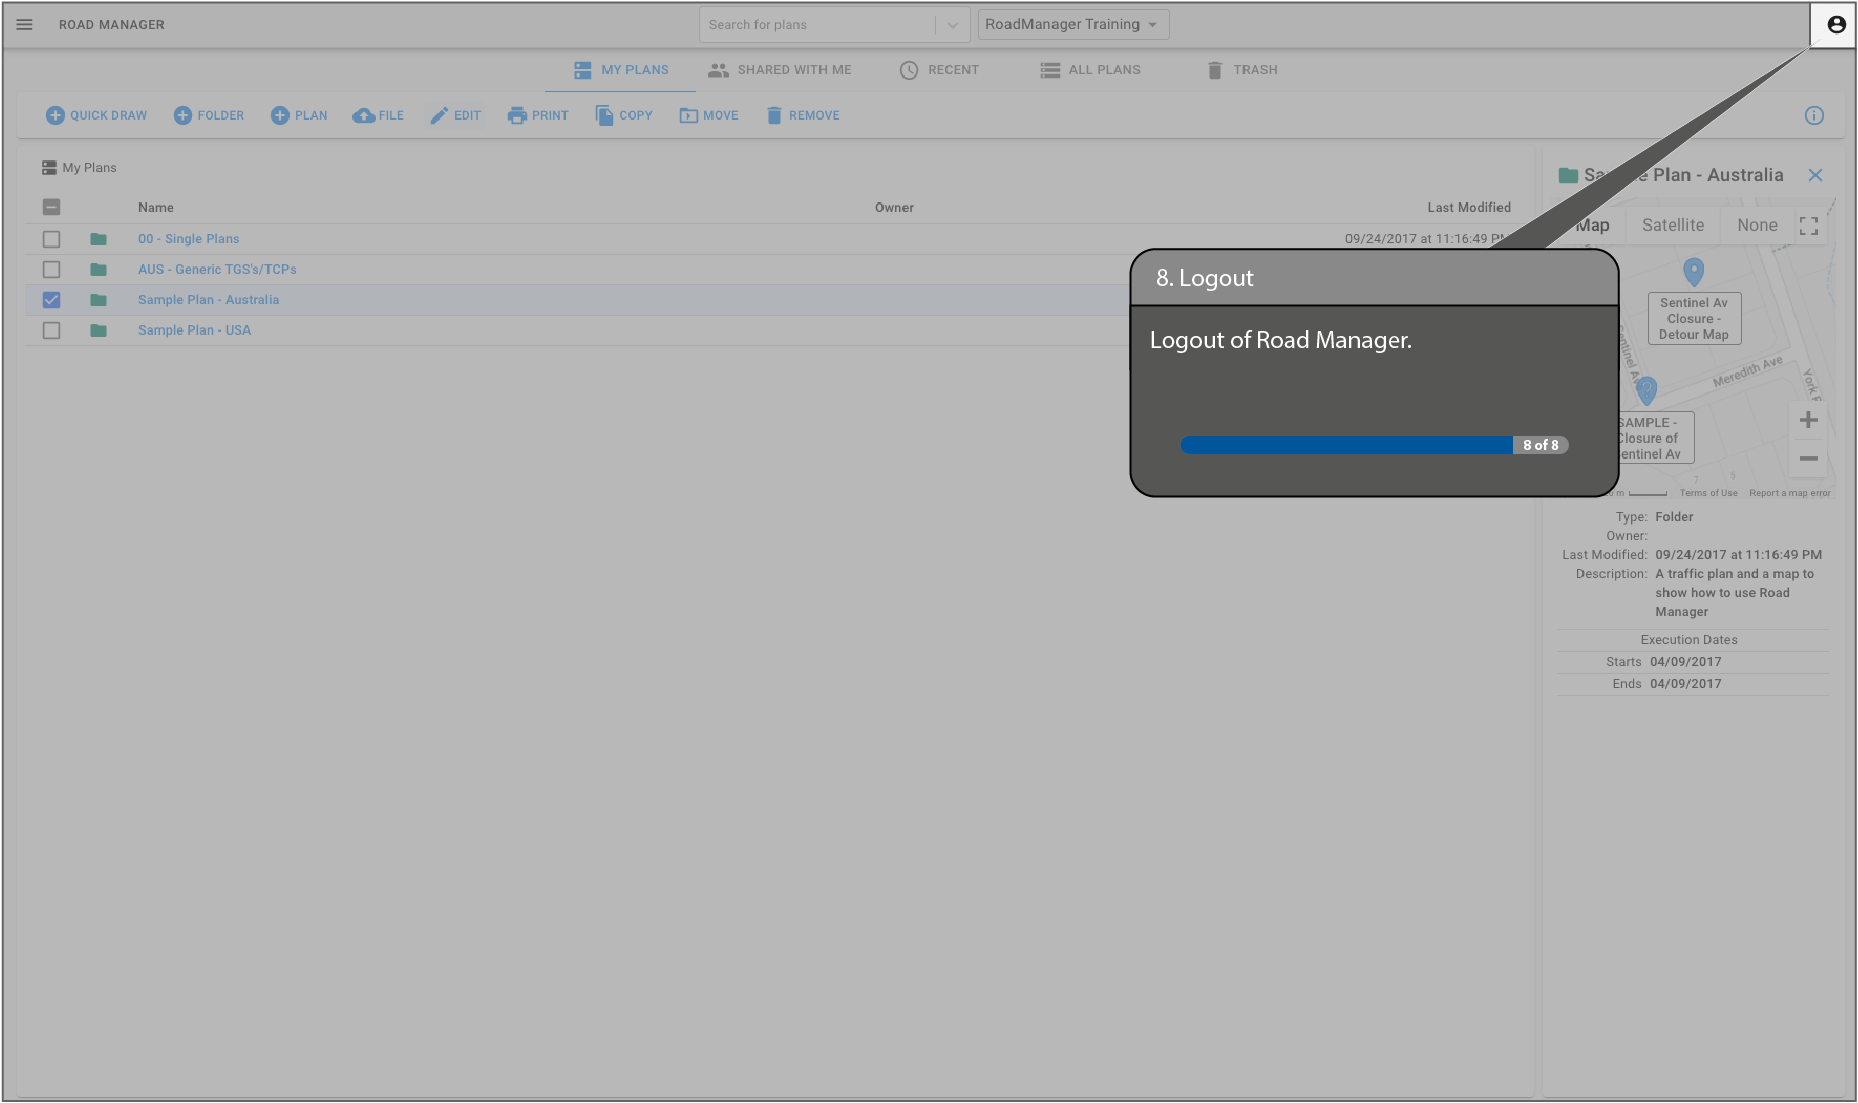
8. Logout
Logout of Road Manager.
User Guides
Download the user guides for detailed instructions on how to use Road Manager.

Full Road Manager User Guide
Adding External Layers Guide
Keyboard Shortcuts
Download the user guides for detailed instructions on how to use Road Manager.
- ‘right mouse click’ off all objects, will deselect everything selected at the time
- ‘right mouse click’ on active vertices of a line or polygon to delete single vertices (the dots on lines)
- ‘hold shift’ whilst drawing = snap to other objects
- Windows – ‘Ctrl + C’ or macOS – ‘Cmd + C’ = Copy
- Windows – ‘Ctrl + V’ or macOS – ‘Cmd + V’ = Paste
- Windows – ‘Hold Ctrl + left mouse click objects’ or macOS – ‘Hold Cmd + left mouse click objects’ = Allows for multiple select of objects
- Hold down the ‘Alt’ key, whilst using the 45 degree rotate tool with multiple objects selected, to rotate objects on their own centre
Templates
Road Manager will save you hours of time, first in drawing your Traffic Plans plans over a live Google Map and then using these customised templates to combine your plans in one document.
Traffic Management Plan
Operational Orders
Variable Message Signs
Training & Training Providers
Road Manager is working with top training providers to deliver traffic management training worldwide and is seeking additional partners.
Our expert training partners use Road Manager to deliver government approved traffic management training that meets local regulations. Your students and clients will learn how to draw traffic plans using cutting edge technology. Road Manager is the perfect tool – using a live Google Map or imported mapping layers to draw your plans then collaborate with colleagues.
Cloud Based Traffic Management Training
This cloud based program is much easier for students to access both in and out of the classroom. And once your students are out in the field they can use Road Manager Live to manage their road works or events. Road Manager is a live program that allows users to manage road work in real time. This will improve quality and safety for workers on the road.
If you are looking for a traffic management training provider, make sure they are using Road Manager.
If you are a training provider, contact us at Road Manager to develop your training solution. Get a traffic control plan tailored to your project’s unique requirements, ensuring maximum effectiveness and safety.
Training in Road Manager
If you need help using Road Manager or would like customised training, contact us.
GET IN TOUCH
Have questions or need assistance? Our dedicated support team is here to help. Reach out to us and we’ll be more than happy to assist you.
